obsp.signal의 correlate 함수와는 다른 목적으로 쓰임. 

2026.09.09 - [Python/obpsy] - obspy.signal.cross_correlation.correlate


obspy.signal.cross_correlation.correlate

더보기 """ Cross-correlation of two signals up to a specified maximal shift. This function only allows 'naive' normalization with the overall standard deviations. This is a reasonable approximation for signals of similar length and a relatively small sh

5daeng.tistory.com


correlate(a,b, shift) ---- 두 비슷한 길이의 신호사이의 상대 shift 찾기 (b가 a에 비해 몇 sample 이동했나?)

correlate_template(data, template) ---- 긴 data안에서 짧은 template이 어디에 있는지 찾기 (이 template이 data에 어디에 있나?)


correlate_template은 shift를 지정하지 않고, template이 data의 전체위에서 움직인다. 

data
------------------------------------------------------------

template
██████

가능한 위치:

██████
  ██████
    ██████
      ██████
         ...
                              ██████


def _window_sum(data, window_len):
    """Rolling sum of data."""
    window_sum = np.cumsum(data)
    # in-place equivalent of
    # window_sum = window_sum[window_len:] - window_sum[:-window_len]
    # return window_sum
    np.subtract(window_sum[window_len:], window_sum[:-window_len],
                out=window_sum[:-window_len])
    return window_sum[:-window_len]

def correlate_template(data, template, mode='valid', normalize='full',
                       demean=True, method='auto'):
    # if we get Trace objects, use their data arrays
    if isinstance(data, Trace):
        data = data.data
    if isinstance(template, Trace):
        template = template.data
    data = np.asarray(data)
    template = np.asarray(template)
    lent = len(template)
    if len(data) < lent:
        raise ValueError('Data must not be shorter than template.')
    if demean:
        template = template - np.mean(template)
        if normalize != 'full':
            data = data - np.mean(data)
            
            
    cc = scipy.signal.correlate(data, template, mode=mode, method=method)
    if normalize is not None:
        tnorm = np.sum(template ** 2)
        if normalize == 'naive':
            norm = (tnorm * np.sum(data ** 2)) ** 0.5
            if norm <= np.finfo(float).eps:
                cc[:] = 0
            elif cc.dtype == float:
                cc /= norm
            else:
                cc = cc / norm
        elif normalize == 'full':
            pad = len(cc) - len(data) + lent
            if mode == 'same':
                pad1, pad2 = (pad + 2) // 2, (pad - 1) // 2
            else:
                pad1, pad2 = (pad + 1) // 2, pad // 2
            data = _pad_zeros(data, pad1, pad2)
            # in-place equivalent of
            # if demean:
            #     norm = ((_window_sum(data ** 2, lent) -
            #              _window_sum(data, lent) ** 2 / lent) * tnorm) ** 0.5
            # else:
            #      norm = (_window_sum(data ** 2, lent) * tnorm) ** 0.5
            # cc = cc / norm
            if demean:
                norm = _window_sum(data, lent) ** 2
                if norm.dtype == float:
                    norm /= lent
                else:
                    norm = norm / lent
                np.subtract(_window_sum(data ** 2, lent), norm, out=norm)
            else:
                norm = _window_sum(data ** 2, lent)
            norm *= tnorm
            if norm.dtype == float:
                np.sqrt(norm, out=norm)
            else:
                norm = np.sqrt(norm)
            mask = norm <= np.finfo(float).eps
            if cc.dtype == float:
                cc[~mask] /= norm[~mask]
            else:
                cc = cc / norm
            cc[mask] = 0
        else:
            msg = "normalize has to be one of (None, 'naive', 'full')"
            raise ValueError(msg)
    return cc


따라서 mode='valid' 인것이 합리적이고 당연하고 실제로 default 값이다. 당연히 template의 길이가 data 보다 짧아야한다.

예를 들어서.

data length     = 1000
template length = 100

#mode='valid'의 결과 길이는 1000-1000+1 = 901

cc[0]은 template와 data[0:100]의 비교 결과
cc[1]은 template와 data[1:101]의 비교 결과
cc[450]은 template와 data[450:550]의 비교결과


Normalization (full)

각 template 위치마다 data window의 normalization을 새로 계산 
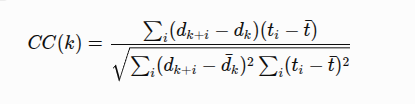
 

그래서 full normalization은 위치마다 denominator가 다르다. 따라서 진폭이 달라도 shape가 같으면 cc=1이 될 수 있다. 

'Python > obpsy' 카테고리의 다른 글

obspy.signal.cross_correlation.correlate  (0) 2026.09.09
더보기
    """
    Cross-correlation of two signals up to a specified maximal shift.

    This function only allows 'naive' normalization with the overall
    standard deviations. This is a reasonable approximation for signals of
    similar length and a relatively small shift parameter
    (e.g. noise cross-correlation).
    If you are interested in the full cross-correlation function better use
    :func:`~obspy.signal.cross_correlation.correlate_template` which also
    provides correct normalization.

    :type a: :class:`~numpy.ndarray`, :class:`~obspy.core.trace.Trace`
    :param a: first signal
    :type b: :class:`~numpy.ndarray`, :class:`~obspy.core.trace.Trace`
    :param b: second signal to correlate with first signal
    :param int shift: Number of samples to shift for cross correlation.
        The cross-correlation will consist of ``2*shift+1`` or
        ``2*shift`` samples. The sample with zero shift will be in the middle.
    :param bool demean: Demean data beforehand.
    :param normalize: Method for normalization of cross-correlation.
        One of ``'naive'`` or ``None``
        (``True`` and ``False`` are supported for backwards compatibility).
        ``'naive'`` normalizes by the overall standard deviation.
        ``None`` does not normalize.
    :param str method: Method to use to calculate the correlation.
         ``'direct'``: The correlation is determined directly from sums,
         the definition of correlation.
         ``'fft'`` The Fast Fourier Transform is used to perform the
         correlation more quickly.
         ``'auto'`` Automatically chooses direct or Fourier method based on an
         estimate of which is faster. (Only availlable for SciPy versions >=
         0.19. For older Scipy version method defaults to ``'fft'``.)

    :return: cross-correlation function.

    To calculate shift and value of the maximum of the returned
    cross-correlation function use
    :func:`~obspy.signal.cross_correlation.xcorr_max`.

    .. note::

        For most input parameters cross-correlation using the FFT is much
        faster.
        Only for small values of ``shift`` (approximately less than 100)
        direct time domain cross-correlation migth save some time.

    .. note::

        If the signals have different length, they will be aligned around
        their middle. The sample with zero shift in the cross-correlation
        function corresponds to this correlation:

        ::

            --aaaa--
            bbbbbbbb

        For odd ``len(a)-len(b)`` the cross-correlation function will
        consist of only ``2*shift`` samples because a shift of 0
        corresponds to the middle between two samples.
    """
###helper

def _pad_zeros(a, num, num2=None):
    """Pad num zeros at both sides of array a"""
    if num2 is None:
        num2 = num
    hstack = [np.zeros(num, dtype=a.dtype), a, np.zeros(num2, dtype=a.dtype)]
    return np.hstack(hstack)

##################################################################################

def _xcorr_padzeros(a, b, shift, method):
    """
    Cross-correlation using SciPy with mode='valid' and precedent zero padding.
    """
    if shift is None:
        shift = (len(a) + len(b) - 1) // 2
    dif = len(a) - len(b) - 2 * shift
    if dif > 0:
        b = _pad_zeros(b, dif // 2)
    else:
        a = _pad_zeros(a, -dif // 2)
    return scipy.signal.correlate(a, b, mode='valid', method=method)
    
##################################################################################

def _xcorr_slice(a, b, shift, method):
    """
    Cross-correlation using SciPy with mode='full' and subsequent slicing.
    """
    mid = (len(a) + len(b) - 1) // 2
    if shift is None:
        shift = mid
    if shift > mid:
        # Such a large shift is not possible without zero padding
        return _xcorr_padzeros(a, b, shift, method)
    cc = scipy.signal.correlate(a, b, mode='full', method=method)
    return cc[mid - shift:mid + shift + len(cc) % 2]
    
##################################################################################
##################################################################################

### main

def correlate(a, b, shift, demean=True, normalize='naive', method='auto'):
  
    if normalize is False:
        normalize = None
    if normalize is True:
        normalize = 'naive'
    # if we get Trace objects, use their data arrays
    if isinstance(a, Trace):
        a = a.data
    if isinstance(b, Trace):
        b = b.data
    a = np.asarray(a)
    b = np.asarray(b)
    if demean:
        a = a - np.mean(a)
        b = b - np.mean(b)
        
    # choose the usually faster xcorr function for each method
    
    _xcorr = _xcorr_padzeros if method == 'direct' else _xcorr_slice
    cc = _xcorr(a, b, shift, method)
    
    if normalize == 'naive':
        norm = (np.sum(a ** 2) * np.sum(b ** 2)) ** 0.5
        if norm <= np.finfo(float).eps:
            # norm is zero
            # => cross-correlation function will have only zeros
            cc[:] = 0
        elif cc.dtype == float:
            cc /= norm
        else:
            cc = cc / norm
    elif normalize is not None:
        raise ValueError("normalize has to be one of (None, 'naive'))")
    return cc


obpsy correlation은 scipy이 correlate 함수를 쓴다.


참고 

2026.09.09 - [Python/Scipy] - scipy.signal.correlate


scipy.signal.correlate

scipy.signal.correlatehttps://docs.scipy.org/doc/scipy/reference/generated/scipy.signal.correlate.html#scipy.signal.correlate>> import numpy as np >>> from scipy import signal >>> import matplotlib.pyplot as plt >>> rng = np.random.default_rng() >>> sig =

5daeng.tistory.com


obspy correlate의 작동방식을 보면,


먼저  전체적인 파이프라인은 아래와 같음


  1. 입력 a,b
  2. Trace면 .data 추출 및  demean
  3. method에 따라 계산 방식 선택 (direct, fft, auto)
  4. 원하는 ±shift 구간의 cross-correlation 계산 및 normalization
  5. return cc
method obspy 함수 scipy mode
'direct' _xcorr_padzeros() 'valid'
'fft' _xcorr_slice() 'full'
'auto' _xcorr_slice() 'full'


_xcorr_slice()

full cross correlation을 계산하고 slice(사용자 지정 shift 만큼)

def _xcorr_slice(a, b, shift, method):

    mid = (len(a) + len(b) - 1) // 2

    if shift is None:
        shift = mid

    if shift > mid:
        return _xcorr_padzeros(a, b, shift, method)

    cc = scipy.signal.correlate(
        a,
        b,
        mode='full',
        method=method
    )

    return cc[
        mid - shift:
        mid + shift + len(cc) % 2
    ]


scipy.correlate을 이용해서 full correlation(lag에 대한 correlation 계산)을 계산한 후 그 간운데 ±shift만 잘라냄.

예시,

len(a) = 1001
len(b) = 1001

# full correlation length : 1001+1001−1=2001


mid = 2001 // 2
    = 1000
    
# full CC index 

index:
0 -------------------------------- 1000 -------------------------------- 2000

lag:
-1000 ----------------------------- 0 -------------------------------- +1000
                                      ↑
                                     mid
                                     
shift = 100 이라고 지정해주면

전체 full correlation

-1000 ================================================ +1000
                         |-----------|
                           ObsPy 반환
                          -100 ~ +100 sample
                          
                          
## ouput length : 2xshift + 1

참고 lag=0 은 두 배열이 첫항부터 정렬되었을때를 말함. 아래 참고

lag = -500

b: b0 ... b500
                ↓
a:              a0 a1 ... a1000

딱 1 sample 겹침


a: a0 a1 a2 ... a500 ... a1000
b: b0 b1 b2 ... b500
   ↑  ↑  ↑       ↑

a[0]과 b[0]이 맞음

lag = +500

a: a0 ... a500 ... a1000
             ↑
b:           b0 ... b500

이때 b가 a 안쪽 뒤쪽에 위치

lag = +1000

a: a0 ....................... a1000
                              ↑
b:                            b0 ... b500

딱 1 sample 겹침

_xcorr_padzeros()

valid mode의 결과 길이가 정확하게 원하는 2*shift + 1 정도가 되도록 두 신호 중 하나를 zero padding한다.

def _xcorr_padzeros(a, b, shift, method):

    if shift is None:
        shift = (len(a) + len(b) - 1) // 2

    dif = len(a) - len(b) - 2 * shift

    if dif > 0:
        b = _pad_zeros(b, dif // 2)
    else:
        a = _pad_zeros(a, -dif // 2)

    return scipy.signal.correlate(
        a,
        b,
        mode='valid',
        method=method
    )


normalize='naive'

norm = (
    np.sum(a ** 2) *
    np.sum(b ** 2)
) ** 0.5


cc /= norm


따라서 아래와 같은 pipeline으로 진행


cc = correlate(
    a,
    b,
    shift=100,
    demean=True,
    normalize='naive',
    method='auto'
)
correlate()
   │
   ├─ a,b numpy array 변환
   │
   ├─ mean 제거
   │
   │    a -= mean(a)
   │    b -= mean(b)
   │
   ├─ method != 'direct'
   │
   └─ _xcorr_slice()
          │
          ├─ signal.correlate(
          │      a,
          │      b,
          │      mode='full',
          │      method='auto'
          │   )
          │
          │        ↓
          │   SciPy가 direct / fft 선택
          │
          └─ ±100 samples slice

         ↓

normalize

         ↓

201개 CC 반환

'Python > obpsy' 카테고리의 다른 글

obspy.signal.cross_correlation.correlate_template  (0) 2026.09.09

scipy.signal.correlate

https://docs.scipy.org/doc/scipy/reference/generated/scipy.signal.correlate.html#scipy.signal.correlate


correlate — SciPy v1.18.0 Manual

Implement a matched filter using cross-correlation, to recover a signal that has passed through a noisy channel. >>> import numpy as np >>> from scipy import signal >>> import matplotlib.pyplot as plt >>> rng = np.random.default_rng() >>> sig = np.repeat([

docs.scipy.org

correlate(in1, in2, mode='full', method='auto')

2개의 N-dimensinal array를 교차상관한다.  mode에 따라서 output size가 결정됨.

  • in1, in2 : 두 input의 차원은 같아야함
  • mode= 'full' 
    • 부분적으로 1 sample만 겹치는 경우까지 전부 포함
    • 개념적으로 y를 x 위에서 왼쪽 끝부터 오른쪽 끝까지 쭉 움직이면서 correlation을 계산
    • 따라서 만약 len(in1)=N, len(in2)=M 이면 len(output)=N+M-1
    • 따라서 모든 lag에 대한 correlation 정도를 알 수 있음.
    • 만약 모든 lag에 대해서 조사를 하고 lag를 제한을 두면 효과적으로 사용 가능 
max_lag_sec = 2.0
max_lag_sample = int(max_lag_sec / dt)

mask = np.abs(lags) <= max_lag_sample

corr_search = corr[mask]
lags_search = lags[mask]

idx = np.argmax(corr_search)

best_lag = lags_search[idx]
  • mode = 'same'
    • mode='full' correlation의 중앙 부분만 잘라서 반환 이때 output의 길이는 in1이랑 같게
    • len(output) = len(in1)
len(master), len(slave)
>>> 1000,1000

##full

signal.correlate(master, slave, mode='full')

lag
-999 ---------------- 0 ---------------- +999

       가능한 모든 shift를 계산


##same

signal.correlate(master, slave, mode='same')

FULL

-999 ---------------- 0 ---------------- +999
          |<------ SAME ------>|


  • mode = 'valid'
    • 한 신호가 다른 신호 안에 완전히 들어와 있을 때만 correlation을 계산
    • 출력길이는 N-M+1
    • template matching에 유용함
    • template이 trace 밖으로 삐져나가는 위치는 아예 계산하지 않으므로
      • "template 전체가 trace에 존재하는 위치에서만 비교하겠다"
      •  


그림으로 비교하면

len(in1)
>>> 5
len(in2)
>>> 3


##full
       x x x x x
y y y
  y y y
    y y y
      y y y
        y y y
          y y y
            y y y

총 7 positions

##same
       x x x x x
    y y y
      y y y
        y y y
          y y y
            y y y

총 5 positions


##valid 
       x x x x x

       y y y
         y y y
           y y y

총 3 positions


  • method 
    • direct 
      • time domain에서 직접 수행(시그마 직접 계산)
      • C[k]=nx[n]y[nk
    • fft 
      • freq. domain에서 두 spectrum을 곱하고 다시 IFFT
    • auto
      • scipy가 직접 판단 (신호길이에 따라 direct와 auto의 계산 효율 차이가 많이 나기 때문)

https://pandas.pydata.org/docs/reference/api/pandas.DataFrame.duplicated.html#pandas.DataFrame.duplicated


pandas.DataFrame.duplicated — pandas 3.0.5 documentation

Only consider certain columns for identifying duplicates, by default use all of the columns.

pandas.pydata.org

DataFrame.duplicated(subset=None, keep='first')

duplicated() -> 중복된 행(데이터)를 찾아서 Boolean(True/False)로 반환

  • Option
    • subset = 특정 열(columns)만 이용 , default = all column
    •  keep 
      • ='first' : 중복된 값 증 처음 등장한 값 : False 그 뒤로는 True
      • ='last' : 중복된 값 중 마직막 등장 값 : False 그 앞으로는 True
      • =False : 중복이 발생한 값의 모든 위치를 True 


예시]

import pandas as pd

s = pd.Series([0.0, 1215.0, 1215.0, 3480.0, 3480.0, 6371.0])

# 1. 기본값 (keep='first') -> 두 번째로 나온 중복값만 True
print(s.duplicated())
# 결과: [False, False, True, False, True, False]

# 2. keep=False -> 중복된 값 전체를 True로 선택
print(s.duplicated(keep=False))
# 결과: [False, True, True, True, True, False]

# 3. 중복된 고유 반경값만 추출
print(s[s.duplicated(keep=False)].unique())
# 결과: array([1215., 3480.])


'Python > pandas' 카테고리의 다른 글

Pandas - read_csv() -text파일, csv파일 불러오기  (0) 2026.04.07

2026.04.13 - [Python] - Python - Class , __init__


__call__ 는 파이썬 클래스의 특수 메서드로, 클래스의 인스턴스(생성된 객체)를 함수처럼 호출가능하게 만들어줌


보통 객체.메서드() 형태로 기능을 실행함. 그런데 __call__을 정의하면 객체()와 같이 이름뒤에 괄호를 붙여 "바로" 실행가능


__call__함수를 안쓴경우  아래처럼 Class내의 메서드를 실행시킨다.


class Dog:
    name = "Sally"
    species = "Mixed"
    def display_Dog(self) :
        print(f"name is {self.name}, species is {self.species}")

dog1=Dog()
dog1.display_Dog()
>>>
name is Sally, species is Mixed


__call__함수를 통해 메서드를 정의하면, 아래와 같이 호출 가능

class Dog:
    name = "Sally"
    species = "Mixed"

    # 메서드 이름을 __call__로 변경
    def __call__(self):
        print(f"name is {self.name}, species is {self.species}")

dog1 = Dog()

# dog1.display_Dog() 대신 dog1()으로 바로 호출 가능
dog1()
>>>
name is Sally, species is Mixed


일반 메서드를 사용하는 것 보다는 코드가 간결해진다. 하지만, 호출시 무슨일이 일어나는지에 대해서는 클래스를 확인해야하는 번거로움이 있다.


그럼 언제 __call__을 쓰는게 좋을까?

위의 예시처럼 단순한 정보를 출력하는 경우에는 display_Dog()처럼 이름을 명시하는게 더 코드 이해에 좋을것이다.

하지만


주요 동작이 하나인경우, 클래스의 목적이 오직 한가지 동작을 수행하는 것일때, 


class CelsiusToFahrenheit:
    def __init__(self, precision=2):
        self.precision = precision

    def __call__(self, celsius):
        # 섭씨를 화씨로 변환하는 공식: (C * 9/5) + 32
        fahrenheit = (celsius * 9/5) + 32
        return round(fahrenheit, self.precision)

# 변환기 객체 생성 (소수점 1자리까지 표시 설정)
converter = CelsiusToFahrenheit(precision=1)

# 객체를 마치 함수처럼 사용하여 온도 변환
print(converter(25))    
>>> 77.0
print(converter(36.5)) 
>>> 97.7


함수처럼 다뤄야 할 때: 다른 함수의 인자로 인스턴스를 넘겨줘야 하는데, 그 함수가 내부적으로 f() 형태의 호출을 기대할 때.


class ThresholdFilter:
    def __init__(self, threshold):
        self.threshold = threshold

    def __call__(self, value):
        # 기준값보다 큰 데이터만 True 반환
        return value > self.threshold

# 데이터 리스트
data = [10, 25, 5, 40, 15]

# 1. 기준이 20인 필터 객체 생성
filter_20 = ThresholdFilter(20)

# 2. filter() 함수에 인스턴스를 인자로 전달
# filter 함수는 내부적으로 f(value) 형태의 호출을 기대함
result = list(filter(filter_20, data))

print(result) 
>>> [25, 40]


'Python' 카테고리의 다른 글

Python - Class , __init__  (0) 2026.04.13
Python - lambda함수  (0) 2026.04.13

클래스는 데이터(Attribute)와 그 데이터를 처리하는 함수(def, Method)를 하나로 묶는 '틀'

클래스를 통해 생성된 실체를 인스턴스(Instance) 또는 객체(Object)라고 부름.


주요 구성요소 및 용어


속성(attribute) : 객체 내부 정의 된 변수

메서드(method) : 클래스 내부에 정의된 함수

   생성자(__init__) 객체가 생성될떄 자동으로 호출되어 초기값을 설정하는 특수 메서드

self : 메서드 내부에서 현재 객체 자신을 가리키는 첫번째 매개변수

인스턴스(instance) : 클래스를 통해 생성된 객체


간단한 클래스를 만들어보자

class Dog:
    name = "Sally"
    species = "Retriever"

dog = Dog()

dog.name
>>> 'Sally'
dog.species
>>> 'Retriever'

여기서 

Atrribute는 name과 species이다. 왜냐하면 클래스 내부에서 정의된 변수이기 때문. 

Attribute도 결국에는 변수이기때문에 바꿀수 있음. 

class Dog:
    name = "Sally"
    species = "Retriever"

dog = Dog()

dog.name
>>>'Sally'

dog.species
>>>'Retriever'

dog.name = "Peter"
dog.species = "German Shepherd"

dog.name
>>> 'Peter'
dog.species
>>> 'German Shepherd'


하지만 이렇게 하면 모든 강아지의 이름이 Sally로 고정 그래서 이름을 바꿀려면 매번 위에처럼 이름을 할당해주거나, 

여러개의 Class를 지정해줘야함.

class Dog:
    name = "Sally"
    species = "Retriever"

dog1 = Dog()
dog2 = Dog()
dog3 = Dog()
 
dog1.name
>>> 'Sally'
dog2.name
>>> 'Sally'
dog3.name
>>> 'Sally'


이럴때 __init__이라는 특수 메서드(함수)를 사용


class Dog:
    def __init__(self, name, species):
        self.name = name
        self.species = species

dog1 = Dog(name = "Alice", species = "Retriver")
dog2 = Dog("Bob", "Sheperd")
dog3 = Dog("Charile", species = "Mixed")
 
dog1.name
>>> 'Alice'
dog1.species
>>> 'Retriever'
dog2.name
>>> 'Bob'
dog2.species
>>> 'Sheperd'
dog3.name
>>> 'Charile'
dog3.species
>>> 'Mixed'

키워드 인자(Keyword Argument) 뒤에 위치 인자(Positional Argument)가 올 수 없음.


__init__ 은 객체를 생성한 순간 : dog1= Dog()를  한 순간 각 객체마다 별도로 가지는 고유 데이터 를 가질 수 있음.


이제 Class에 함수를 추가하자(method) 

아래는 개의 이름과 종을 출력하는 display_Dog 함수(메서드)를 추가했다.


class Dog:
    def __init__(self, name, species):
        self.name = name
        self.species = species

    def display_Dog(self) :
        print(f'Dog name is {self.name}, species is {self.species}')

dog1 = Dog(name = "Alice", species = "Retriver")
dog1.display_Dog()
>>> Dog name is Alice, species is Retriver

여기서 주의 할점은 self.name 대신 name이나 self.species대신 species라고 적으면 안된다. 

왜냐하면 name, species은 __init__ 메서드 안에서 정의된 지역변수이기 때문이다.


여기서 인스턴스는 Dog() 클래스로 생성된 dog1인데, self는 dog1 자기 자신을 뜻한다.

클래스 안에서는 dog1을 self라고 부름. 


외부로 부터 Class를 import할 수 도 있다.

만약 아래와 같은 class를 Dog.py로 저장했다고 해보자

>>>Dog.py
class Dog:
    def __init__(self, name, species):
        self.name = name
        self.species = species

    def display_Dog(self) :
        print(f'Dog name is {self.name}, species is {self.species}')


그럼 Dog.py 같은 경로에서 아래와 같이 import 해서 사용 가능 

from Dog import Dog

dog1 = Dog("Alice", "Poodle")
dog1.display_Dog()

>>>Dog name is Alice, species is Poodle


'Python' 카테고리의 다른 글

Python - __call__  (0) 2026.04.13
Python - lambda함수  (0) 2026.04.13

+ Recent posts